
[Heading 2] The Ultimate MACD and Stochastic Strategy: Master the "Double Cross"
Most traders rely on default indicator settings—MACD (12, 26, 9) or a standard Stochastic.
But let’s be honest: how often have you been stopped out by “market noise” just before a major trend took off?
In this guide, I will reveal a high-probability strategy that filters out the noise and focuses only on high-conviction setups.
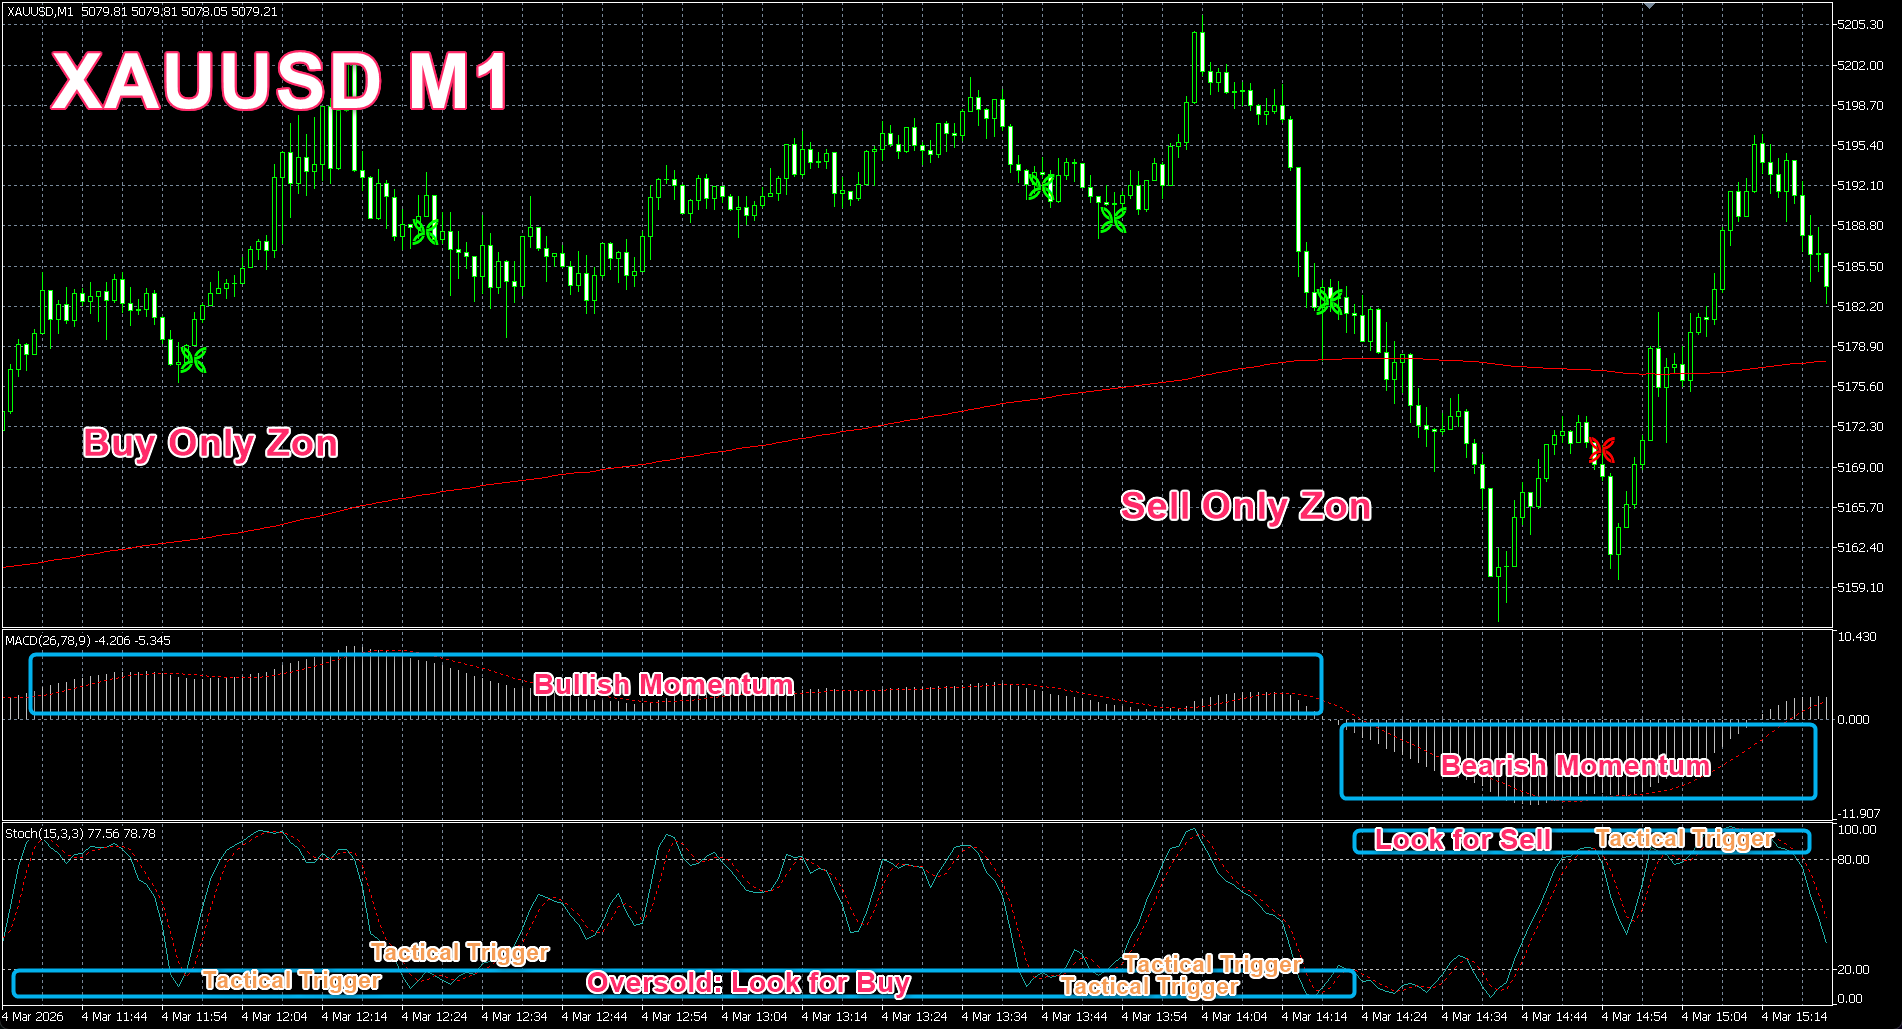
By synchronizing a 200 SMMA trend filter with a specialized MACD (26, 78, 9) and Stochastic (15, 3, 3) combination, we move away from messy mid-range entries.
Instead, we wait like a sniper for the deep pullbacks at levels 20 and 80. If you are tired of inconsistent results and want a disciplined approach to trend-following, this strategy is for you.
[Heading 2] The North Star of Your Trading: 200 SMMA Filter
The biggest mistake most retail traders make is trying to pick tops or bottoms against a massive trend. Without a clear “North Star,” you are just gambling in the noise.
This is why we use the 200-period Smoothed Moving Average (SMMA) as our primary filter. The rule is absolute and non-negotiable:
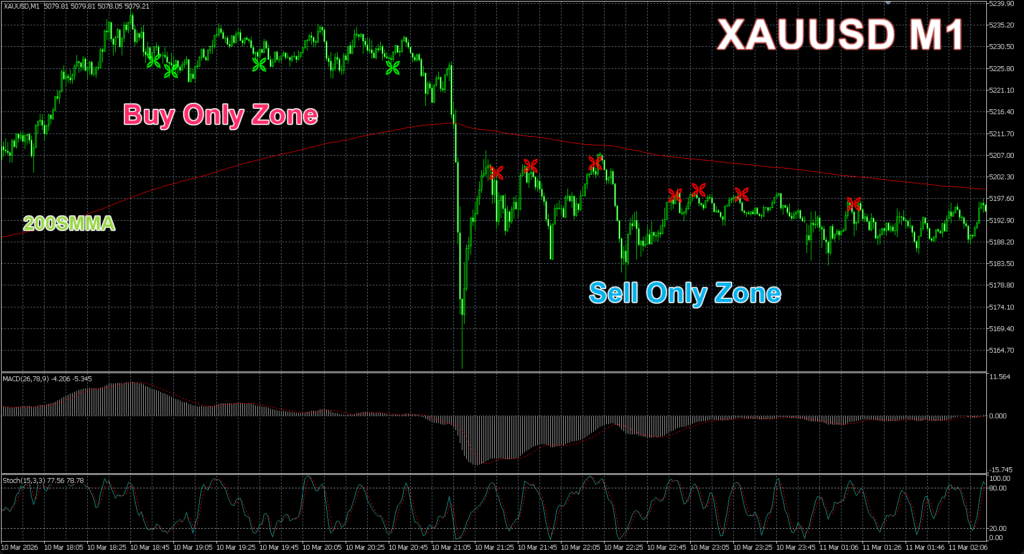
- Price above 200 SMMA? We only look for Long (Buy) setups.
- Price below 200 SMMA? We only look for Short (Sell) setups.
Why the SMMA?
Unlike a simple moving average (SMA), the SMMA provides a much smoother trend line by assigning weight to price data over a longer period. It filters out “fake-outs” and ensures we are only trading with the dominant momentum of the market.
By following this single rule, you instantly eliminate 50% of losing trades caused by fighting the trend.
[Heading 2] Precision Over Speed: The Logic Behind Our Custom Settings
Most traders fail because they use the default MACD (12, 26, 9). While fast, it often reacts to minor price fluctuations, leading to “fake-outs” in a trending market. To achieve consistent results, we prioritize precision over speed.
[Heading 3] The Confirmation Engine: MACD (26, 78, 9)
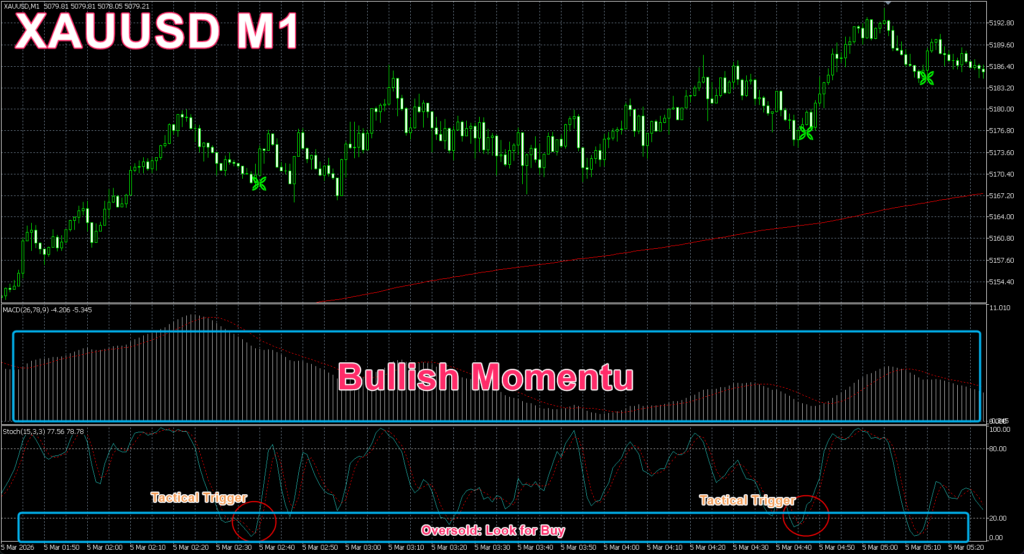
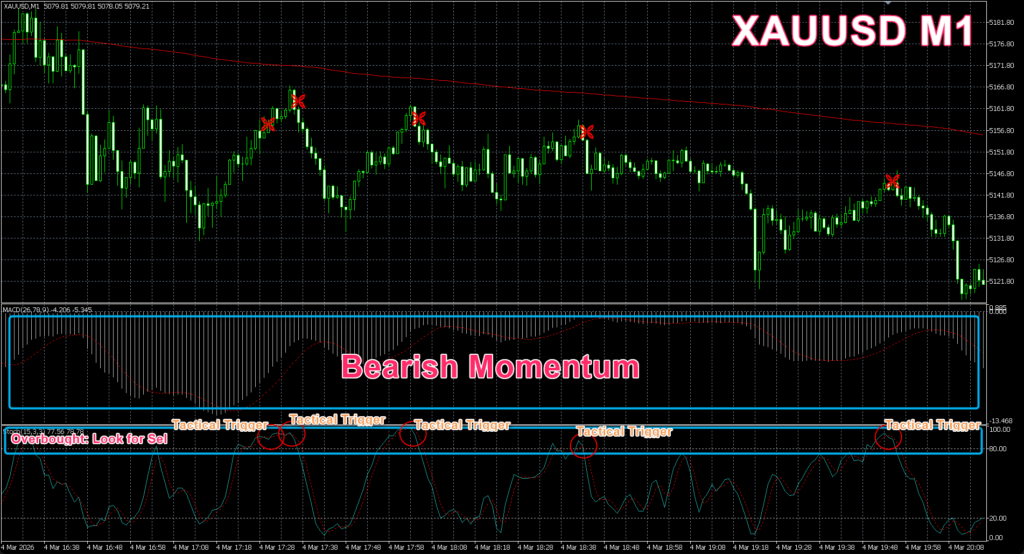
By using a longer period, we smooth out the volatility and identify the “True Momentum” of the trend. When the MACD main line is above the zero level, it confirms that the bulls are firmly in control.
[Heading 3] The Tactical Trigger: Stochastic
While MACD tells us the direction, the Stochastic tells us the exact moment to strike. The (15, 3, 3) setting is calibrated to find deep pullbacks without being too sensitive to minor noise.
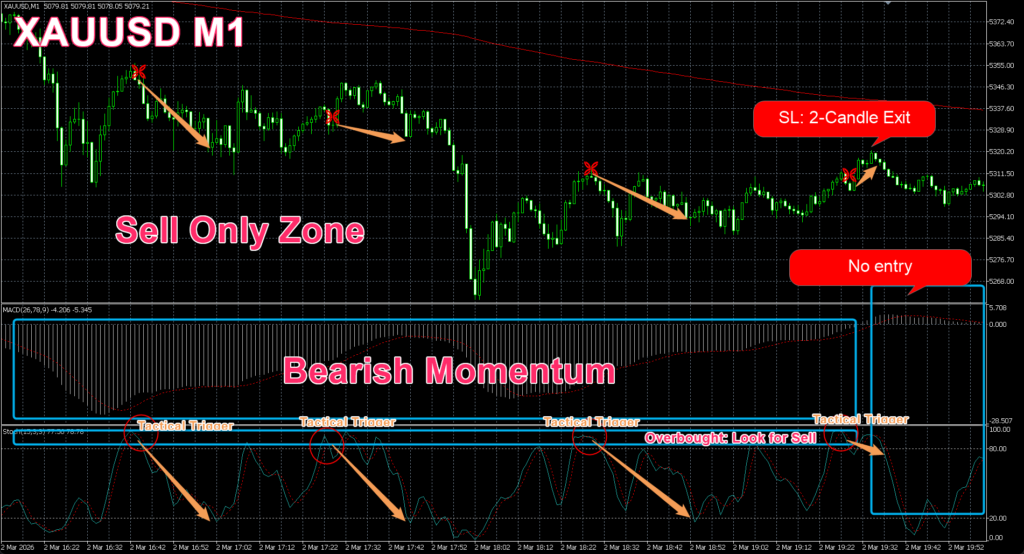
[Heading 2] The “Double Cross” Phenomenon
When these two indicators synchronize—MACD showing strong trend support and Stochastic signaling an oversold/overbought reversal—you get a “Double Cross.”
This is not just a random intersection; it is a high-probability confluence point where the market’s spring is fully coiled and ready to release in the direction of the 200 SMMA.
[Heading 2] The Discipline of a Sniper: Precision Over Volume
Most retail traders lose money because of FOMO (Fear Of Missing Out). They jump into the market at mid-range levels, such as when the Stochastic is near 50. In the fast-paced 1-minute timeframe, this “middle zone” is often filled with indecisive noise, leading to “chop” and painful whipsaws.
To gain a professional edge, you must trade like a sniper. We ignore the noise and wait for the price to pull back deeply until the Stochastic hits the extreme levels (20 for Longs, 80 for Shorts).
Why Level 20 and 80?
These levels represent the “coiled spring” of the market. When the price hits these extremes while staying aligned with the 200 SMMA trend, it signals that the temporary correction is exhausted and the primary trend is ready to resume.
- Long Setup: Price > 200 SMMA + MACD > 0 + Stochastic < 20 (Golden Cross).
- Short Setup: Price < 200 SMMA + MACD < 0 + Stochastic > 80 (Dead Cross).
By ignoring the “messy middle” and only striking at the extremes, you significantly increase your win rate and ensure that the momentum is firmly back in your favor the moment you enter.
[Heading 3] The “6-Candle Buffer” Rule: Protecting Your Capital
In the fast-paced 1-minute timeframe, it is easy to fall into the trap of over-trading. To prevent this, our strategy includes a mandatory “cooldown” period:
- The Rule: Once a signal is generated (whether it hits TP or SL), you must wait for at least 6 candles before looking for the next entry.
- The Logic: This 6-minute window allows the market to “breathe” and prevents you from jumping into the same minor fluctuation multiple times.
By enforcing this discipline, you ensure that every trade you take is a fresh, independent opportunity rather than an emotional reaction to previous price action.
[Heading 2] The Best Instrument for High Precision: GOLD (XAUUSD)
While this strategy works on major currency pairs, its true power is revealed on GOLD (XAUUSD).
Gold offers the perfect environment for 1-minute scalping due to its high volatility and clear trending behavior. When the “Double Cross” aligns on Gold, the momentum is often explosive.
- Primary Asset: GOLD (XAUUSD)
- Secondary Assets: EUR/USD, GBP/USD (for lower-volatility sessions)
- Recommended Timeframe: 1-Minute (M1)
Why Gold?
Gold respects the 200 SMMA remarkably well on the 1-minute chart. When the price pulls back to the Stochastic 20/80 extremes while the 200 SMMA trend is intact, it often signals a high-conviction “spring-load” effect.
Pro Tip for Gold Scalpers:
Due to the higher volatility of XAUUSD, ensure your broker offers tight spreads. Even a small difference in spread can impact your 1-minute precision.
[Heading 2] Risk Management: Precision Exits
In 1-minute scalping, fixed pips can sometimes be too slow. To maintain high precision, we align our exits with the same indicators we use for entry:
1. Stop Loss (SL): The 2-Candle Rule
- The Rule: If the price moves 2 candles against your entry direction after the Stochastic cross, you must exit immediately.
- The Logic: In a high-conviction “Double Cross” setup, the momentum should follow through almost instantly. If the price stalls or reverses for 2 consecutive minutes, the immediate edge is gone. Cut your losses early and wait for the next setup.
2. Take Profit (TP): The Extreme Reversal
- The Rule: Exit the trade as soon as the Stochastic reaches the opposite extreme level.
- For Longs: Close the trade when the Stochastic touches or exceeds 80.
- For Shorts: Close the trade when the Stochastic touches or falls below 20.
- The Logic: This ensures you capture the “meat” of the momentum move and exit before the inevitable pullback or reversal occurs.
3. Position Sizing
Even with these tight exits, never risk more than 1% of your account per trade. Protecting your capital allows you to stay in the game for the next high-probability setup.
Conclusion: Practice Makes Precision
The “Double Cross” is a powerful tool, but it requires patience and quick execution. Don’t chase the market—let the market come to your levels. We strongly recommend testing this on a demo account for at least 50 trades to get a feel for the 1-minute momentum.
Disclaimer: Trading Forex involves significant risk. The content on PrecisionFX-Signals.com is for educational purposes only. Always trade responsibly.
To achieve the same precision as this strategy, we recommend using a low-spread broker. We use TitanFX for its lightning-fast execution on Gold (XAUUSD).
To get the best results with this Gold strategy, we highly recommend using a high-speed broker. [Check why we choose TitanFX for Gold scalping]

Comments